
Hamachi by LogMeIn is a premium hosted on-demand virtual private networks service which allows its users to extend wired networks like Local Area Networks to workers working on remote locations, distributed teams, gamers, etc. in no time.
Although these vast uses of LogMeIn Hamachi, sometimes it generates errors like hamachi service not found or Hamachi: service stopped, which is annoying for its users.
If you are wondering how to fix the hamachi service stopped error or the error of hamachi service not found, you will find the below solutions and methods pretty handy and efficient to solve them.
Fix Hamachi service stopped on Windows 10
To solve Hamachi service errors, you can follow either one method or more preferred solutions from the below ways.
Solution 1: Enable WMI Service
Hamachi from LogMeIn is a typical but particular type of program which requires support from the WMI (Windows Management Instrumentation) service to run correctly in the Windows Operating System.
1 ) Open the run dialogue box on your windows with Win + R from your keyboard.
2 ) Type “services.msc” and then click on the OK button.

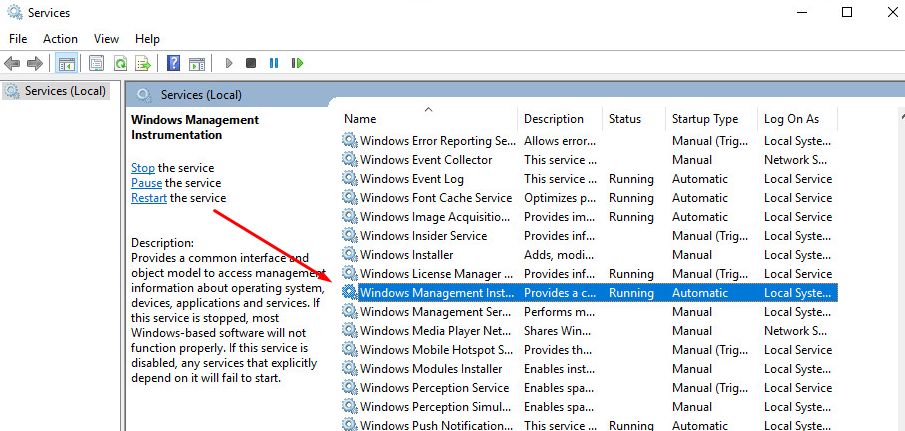
3 ) Find the service named Windows Management Instrumentation and right-click on it to find its properties and then click on the Properties.
4 ) If the WMI service is not running, click on the Start button and make sure that the Startup type option is set to the Automatic feature.
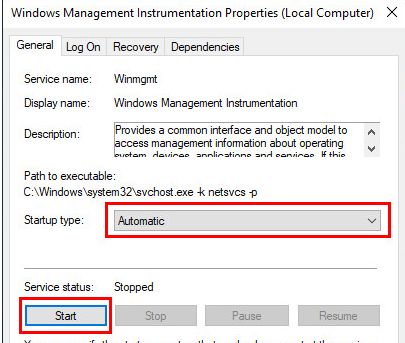
5 ) Now to allow these WMI settings to take place, click on the Apply button then select the OK button.
6 ) Try running the Hamachi service to see if the Hamachi service errors are eliminated or not.
Also Read: How to Reset BIOS Password
Solution 2: Configure the Tunneling Engine of Hamachi by LogMeIn
1) Open run dialogue box.
2) In the Run Dialog Box, type “services.msc” and then click on the OK button.
3 ) Find the service named LogMeIn Hamachi Tunneling Engine and right-click on it to find its properties and then click on the Properties.
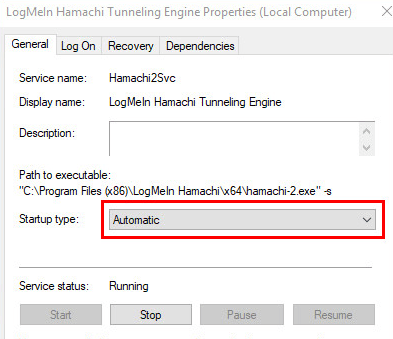
4 ) If the LogMeIn Hamachi Tunneling Engine service is not running, click on the Start button and make sure that the Startup type option is set to the Automatic feature.
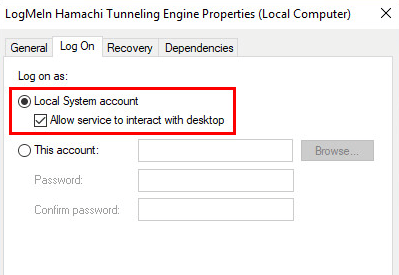
5 ) Now open the tab called Log On, and if the two check-boxes named Local System account and the Allow service to interact with the desktop are not checked, then check on these boxes. Then click on the OK button.
6 ) Invoke the File Explorer by using any method you like.’
7 ) In the explorer’s address bar type in the directory called “C:\Program Files (x86)\LogMeIn Hamachi”.
Note: LogMeIn Hamachi may be installed in a different driver than the C drive, so you have to check that.
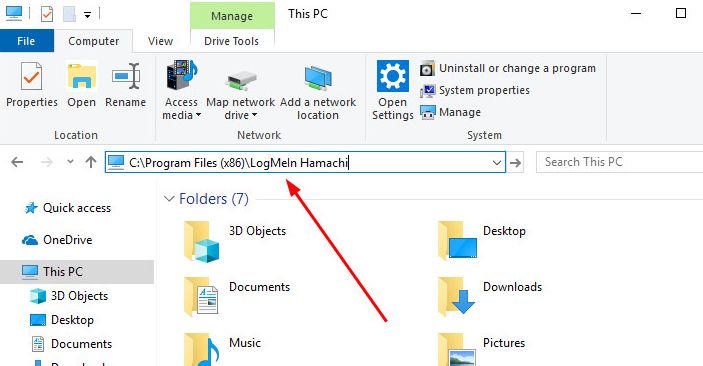
8 ) Now you have to right-click on an executable file called hamachi-2-ui.exe and then open its Properties.
9 ) Now under the tab called the Security, edit the Users group permissions to “Read & execute,” if they are not set to the said option by default.
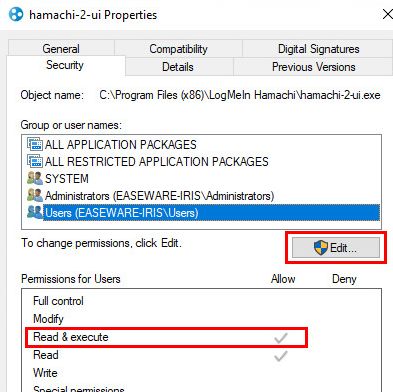
10 ) Click the OK button to finish the hamachi-2-ui.exe settings.
11 ) Run the LogMeIn Hamachi service to check for the solved problem.
If you are wondering about How do I start hamachi? Then this solution about Hamachi by LogMeIn can be your best bet.
Solution 3: Try Reinstalling the LogMeIn by Hamachi Service
Sometimes while installing the LogMeIn, some conflicting files and settings cause the error of Hamachi service not found, or the Hamachi service stopped. In that case, you can try reinstalling the Hamachi by LogMeIn to solve the error.
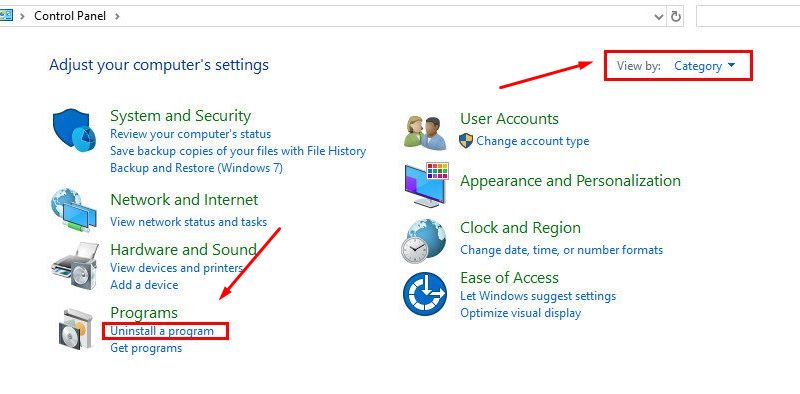
1 ) Open the Start menu and then search for Control Panel.

2 ) Choose the “Uninstall a program” option under the View by Category section.
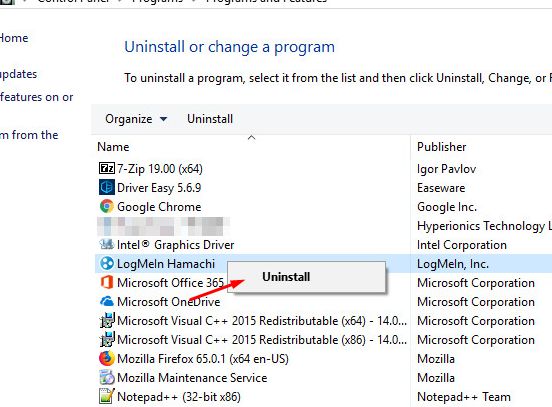
3 ) Find the LogMeIn Hamachi and right-click on it to see the Uninstall option. Click on the Uninstall option and follow the instructions presented to you by the Windows wizard for uninstalling a program.
4 ) Download a fresh and clean version of Hamachi from its official website. Link: LogMeIn Hamachi Official Website.
5 ) Try installing the Hamachi by LogMeIn with proper guidance and adequate information.
6 ) Open the Hamachi service again to see if the errors are solved or not.
Solution 4: Change Startup settings
For the automatic restart process of Hamachi service on windows by modifying the Startup settings, follow on.
1) Open or run the notepad as administrator by typing the keyword “notepad” in the Start menu.
2 ) Copy and paste or write down the below lines into the notebook.
net stop Hamachi2Svc
net start Hamachi2Svc
start "C:\Program Files (x86)\LogMeIn Hamachi\hamachi-2-ui.exe"
exit

Note: Make sure to write down the correct Hamachi installation path
3) Save this text file filled with Hamachi related code lines.
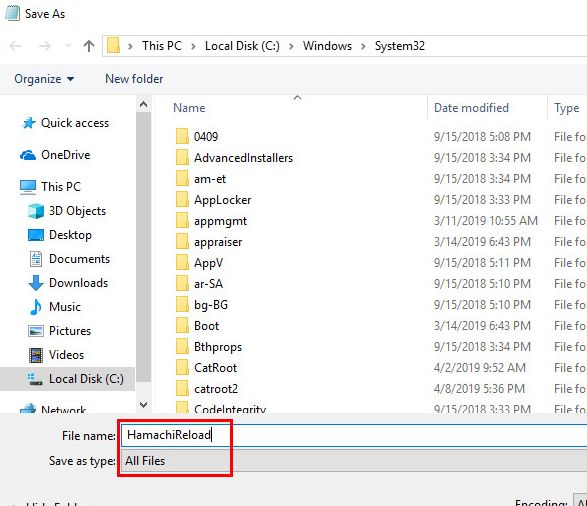
4) Whiles saving this Hamachi-related file, name it as HamachiReload.cmd and save it to the C: WindowsSystem32 directory.
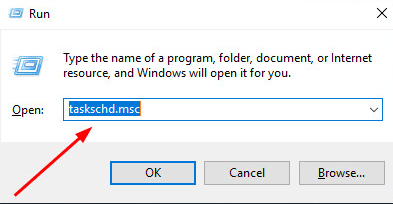
5 ) Open the Run dialogue box with Win +R.
Type “taskschd.msc” and then click on the OK button.
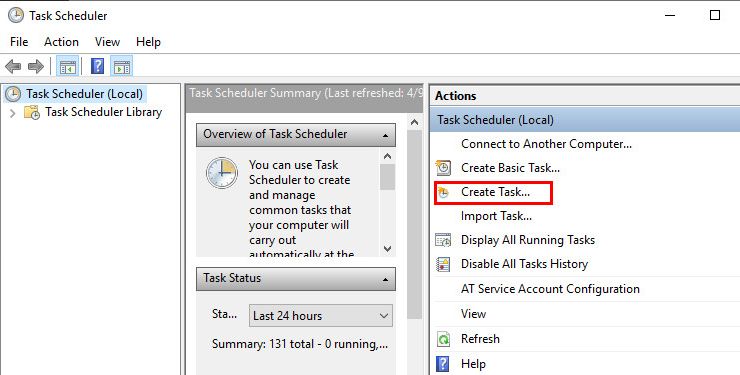
6) Select the Create Task option from the Action menu.
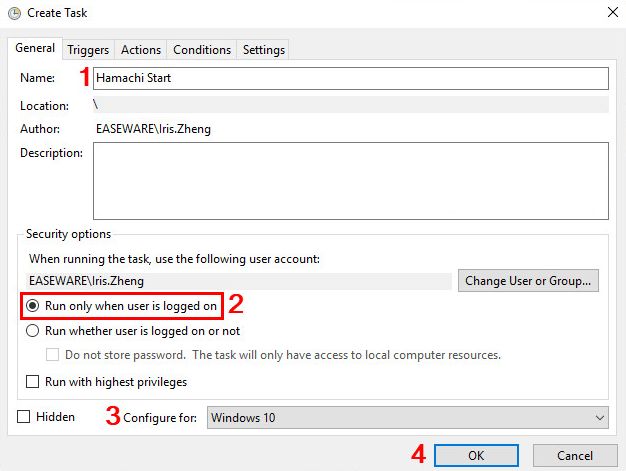
7 ) In the Tab called the General tab, assign a name to the task.
Make sure the option Run only when the user is logged on is checked on, and the Configure for the option is set for Windows 10. Then click the OK button.
8) In the Triggers tab, click the New button.
9) Assign “At startup” to the Begin task option. Then ensure to check on the Enabled checkbox before clicking on the OK button.
10) In the Actions tab, click on the New option.
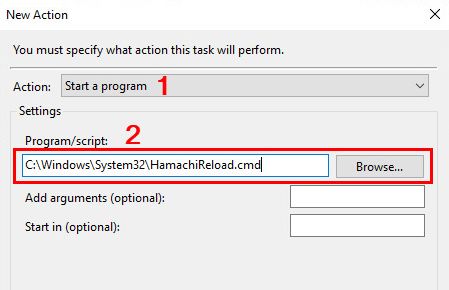
11) Assign the Action an option called Start a program. Then click on the Browse option and open the directory called C:\Windows\System32 and search for the HamachiReload.cmd file and open it. To save it, click on the OK button.
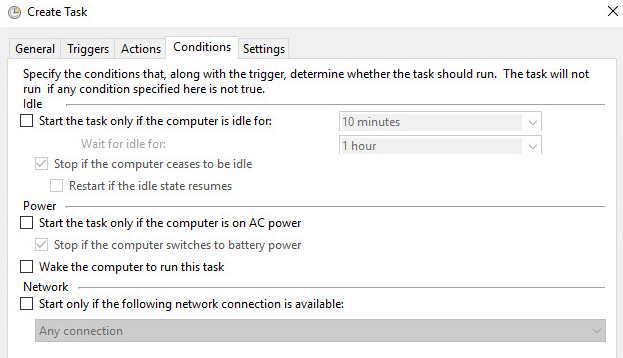
12) Now in the Conditions tab, ensure that everything is unchecked before clicking on the OK button.
Next time when your computer system is started, the Hamachi service will automatically get called and restarted. If you are searching for an option like “start hamachi service command line,” the above method will work for its solution.
We hope this article describing to Fix hamachi service stopped error has solved all your queries about the error called hamachi service not found.


