If you are using Windows 10, then you know that Microsoft has added a new advanced feature in Windows 10 called Fast User Switching. This new feature allows users to quickly switch between different accounts. Well, this Fast User Switching feature is also available in older Windows versions. Fast User Switching might be convenient, but also comes with disadvantages and that is why many users are looking for how to disable Fast User Switching. Today we are sharing how you can enable or disable Fast User Switching in Windows 10.
Many users are changing user accounts very quickly and this is why Fast User Switching is very useful for you. You can use Local Group Policy Editor to change the Fast User Switching policy setting. Fast user switching allows users to sign into their different accounts very quickly. The primary and most obvious feature of fast user switching is enabling users to sign into their account without forcing other users to log out.
Disable Fast User Switching in Windows 10
Some Windows 10 features are good but some of them are very annoying. Fast User Switching is one of them. Many users don’t want to use Fast User Switching and they are searching for how to disable Fast User Switching because it uses more CPU and RAM.
Fast User Switching is a beneficial feature offered by windows to its users. Fast User Switching is a beneficial feature in Windows which allows you to rapidly switch between different accounts.If you aren’t sure of yourself, then you may download registry and restart PC.
Let’s start the guide to Enable or Disable Fast User Switching.
Method 1: Using Local Group Policy Editor
Disabling user switching requires editing and accessing the group policy editor or the registry editor. It is a very simple task. Make sure that you carefully follow this tutorial. First things first, you need to know that we are not really disabling fast user switching. You can not really disable this Windows feature that is built-in. What we’re actually doing is hiding the tools that allow users to get fast user switching, which ultimately has an identical outcome.
Step 1: Press Win + R to open Run and then type gpedit.msc. Press Enter after that.

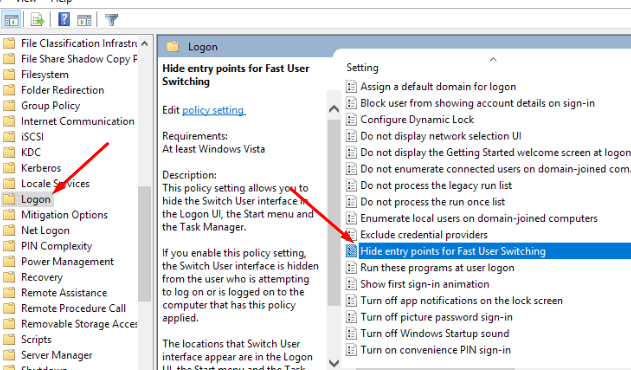
Step 2: Now In Local Group Policy Editor, expand following things and navigate to Local Computer Policy\Computer Configuration\Administrative Templates\System\Logon.

Now find, Hide Entry Points for Fast User Switching.
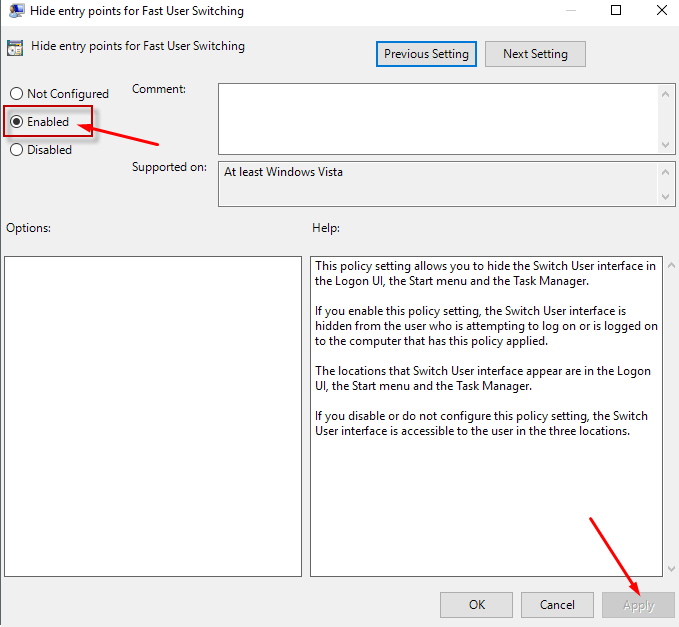
After that, you have to select Enabled to disable Fast User Switching.

If you want to turn it on again then click on Disable and then save settings.
Also Read: Fix Windows 10 Taskbar Not Hiding issue
Method 2: Use Registry to Disable Fast user switching
Step 1: Open Run using win + R key on the keyboard. Then type regedit.exe to open the registry editor.
Confirm the UAC prompt if you see. Now navigate to this path:
HKEY_LOCAL_MACHINE\SOFTWARE\Microsoft\Windows\CurrentVersion\Policies\System

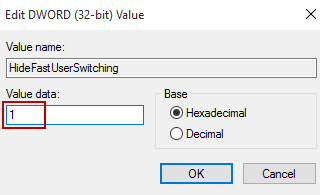
Now find HideFastUserSwitching in right side.
If it is not available there, then right-click on system on left side > new > Dword (32-bit) Value > Name it to HideFastUserSwitching. Now double-click on it and set the value to 1.

Now restart your PC.
If you want to enable fast user switching then change the value 1 to 0 again.
Final words
These two methods are working fine for all the users. If you are unable to enable or disable Fast User Switching then comment below. Share this article on social media and stay tuned.


