


Animations add a lot of motion to sports and fitness apps encouraging people to pull on their running shoes for fitness exercises. For instance, this UI concept pictures an activity tracking app that synchronizes with fitness trackers, bracelets, or smartwatches and lets you see a timeline and charts that display your daily activities. You can learn more about activity tracking technology in the following article: https://yalantis.com/blog/what-activity-tracking-technology-is-used-in-fitness-app-development.
This concept can help other fitness app developers make their app’s UI more intuitive, fun, and engaging. The component is called FitTrack, a compound from fitness tracking, and this animation is contributed to the open-source.
In this article, you will learn how you can use the FitTrack app component in your own project. And then, you’ll take a look under the hood to see what parts this animation consists of.
How to use the animation
Create a collection “activities” that will contain animation view:
let activities = ActivityDataProvider.generateActivities()
animationView.configureSubviews(activities.count, activities: activities)
Activity is a structure of the same name that looks like that:
struct Activity {
let title: String!
let goal: Float!
let currentProgress: Float!
let activityResource: ActivityResource!
}
HereActivityResource is also a structure that stores resources for Activity (pictures, fonts, colors):
struct ActivityResource {
let normalActivityButtonImage: UIImage!
let selectedActivityButtonImage: UIImage!
let gradientImage: UIImage!
let textColor: UIColor!
}
To create activity do the following:
// calories activity
let caloriesActivityResource = ActivityResource(normalActivityButtonImage: UIImage(named: “cal_normal”)!, selectedActivityButtonImage: UIImage(named: “cal_active”)!, gradientImage: UIImage(named: “grad_orange”)!, textColor: UIColor.caloriesActivityColor())
let caloriesActivity = Activity(title: “Calories”, goal: 2000, currentProgress: 1500, activityResource: caloriesActivityResource)
activities.append(caloriesActivity)
Also for the launch animation (just like in Twitter) you should use the method of the ZoomStartupAnimation class:
ZoomStartupAnimation.performAnimation(window!, navControllerIdentifier: “navigationController”, backgroundImage: UIImage(named: “bg”)!, animationImage: UIImage(named: “logo”)!)
Where animationImage is a picture that will be glued together.
What’s under the hood of the animation?
Three classes form the core of the component:
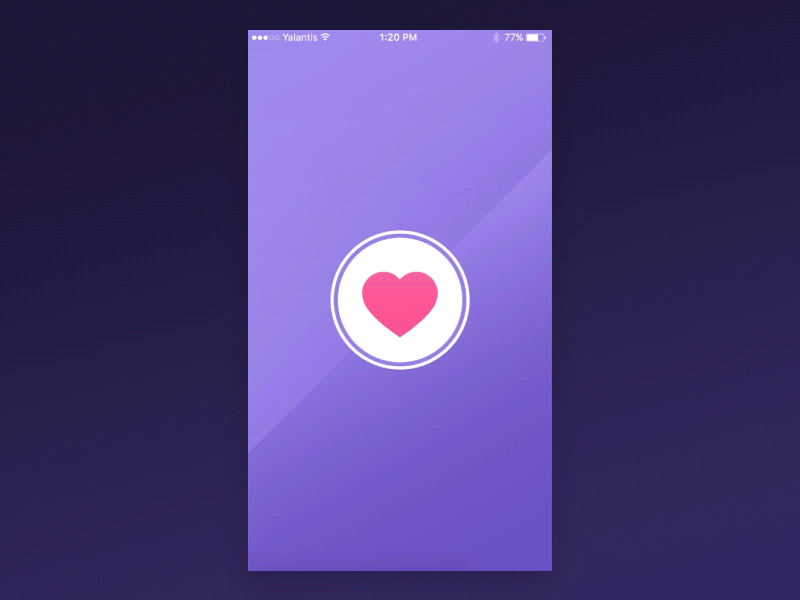
- ZoomStartupAnimationis a class responsible for the launch animation (the heart).
- AnimationView (Animations extension) is a class that counts the initial size and positions of the buttons. It is also an extension that contains a variety of animations.
- ActivityContainerViewis a class-container that contains activities and animations while one activity is changing for another one.
Let’s take a closer look:
The ZoomStartupAnimation class has one static method performAnimation that creates a new mask with a picture transmitted to it, as well as a background with the same picture for a correctly animated resizing:
// logo mask
navController.view.layer.mask = CALayer()
navController.view.layer.mask!.contents = animationImage.CGImage
navController.view.layer.mask!.bounds = CGRect(x: 0, y: 0, width: startAnimationImageWidth, height: startAnimationImageWidth)
navController.view.layer.mask!.anchorPoint = CGPoint(x: 0.5, y: 0.5)
navController.view.layer.mask!.position = CGPoint(x: navController.view.frame.width / 2, y: navController.view.frame.height / 2)
// logo mask background view
let maskBackgroundImageView = UIImageView(frame: navController.view.layer.mask!.frame)
maskBackgroundImageView.image = animationImage
navController.view.addSubview(maskBackgroundImageView)
navController.view.bringSubviewToFront(maskBackgroundImageView)
Then, the class enlarges (CAKeyframeAnimation(keyPath: “bounds”)) the mask scale and after a small delay hides or deletes it:
let transformAnimation = CAKeyframeAnimation(keyPath: “bounds”)
transformAnimation.duration = transformAnimationDuration
transformAnimation.beginTime = CACurrentMediaTime() + transformAnimationDelay
let initalBounds = NSValue(CGRect: navController.view.layer.mask!.bounds)
let finalBounds = NSValue(CGRect: CGRect(x: 0, y: 0, width: finishAnimationImageWidth, height: finishAnimationImageWidth))
transformAnimation.values = [initalBounds, finalBounds]
transformAnimation.timingFunctions = [CAMediaTimingFunction(name: kCAMediaTimingFunctionLinear)]
transformAnimation.removedOnCompletion = false
transformAnimation.fillMode = kCAFillModeForwards
navController.view.layer.mask!.addAnimation(transformAnimation, forKey: “maskAnimation”)
maskBackgroundImageView.layer.addAnimation(transformAnimation, forKey: “maskAnimation”)
The AnimationView class is responsible for the calculation of the initial positions and sizes of the buttons depending on their number. The following method takes care of this:
private func createAndSetStartPositionRoundActivityButtons() {
let allContentWidth = bounds.width
let buttonWidth = allContentWidth / CGFloat(activitiesCount)
gapBetweenActivityButtons = (buttonWidth / ratioItemWidthToGap)
let deltaWidth = gapBetweenActivityButtons / CGFloat(activitiesCount)
realActivityButtonWidth = (buttonWidth – deltaWidth – gapBetweenActivityButtons)
centerActivityRoundButton = RoundActivityButton.init(frame: CGRectMake(0, 0, realActivityButtonWidth * animateScalFirsteButtonCoefficient, realActivityButtonWidth * animateScalFirsteButtonCoefficient))
centerActivityRoundButton!.backgroundColor = UIColor.clearColor()
centerActivityRoundButton!.center = CGPointMake(bounds.width / 2, (bounds.height / 2) / dropButtonsPositionCoefficient)
centerActivityRoundButtonIndex = activitiesCount%2 == 0 ? -1 : activitiesCount / 2
currentActiveRoundButtonTag = 0
addSubview(centerActivityRoundButton!)
for index in 0..<activitiesCount {
let startFrame = CGRectMake(gapBetweenActivityButtons + (gapBetweenActivityButtons + realActivityButtonWidth) * CGFloat(index), -realActivityButtonWidth, realActivityButtonWidth, realActivityButtonWidth)
let roundButton = RoundActivityButton.init(frame: startFrame)
let activity = activities![index]
let normalStateImage = activity.activityResource.normalActivityButtonImage
let selectStateImage = activity.activityResource.selectedActivityButtonImage
roundButton.setBackgroundImage(normalStateImage, forState: .Normal)
roundButton.setBackgroundImage(selectStateImage, forState: .Selected)
roundButton.setBackgroundImage(selectStateImage, forState: [.Highlighted, .Selected])
roundButton.userInteractionEnabled = false
roundButton.tag = index
roundButton.addTarget(self, action: “roundButtonPressed:”, forControlEvents: .TouchUpInside)
roundActivityButtons.append(roundButton)
subview?.addSubview(roundButton)
}
// it’s necessary when collecting all items. First item should be always bring to front
subview?.bringSubviewToFront(roundActivityButtons[0])
activityContainerView.transform = CGAffineTransformMakeScale(transformScale, transformScale)
subview?.bringSubviewToFront(activityContainerView)
}
The Animations extension to the AnimationView class is responsible for animating all child objects using simple blocks of the view animation, and launches the next animation in every completion block. The extension moves the buttons one by one from the top of the view to the center. After the last button is moved, the extension will launch the animation that will increase the distance between the buttons:
internal func aimateDrop() {
struct Counter {
static var index = 0
}
if Counter.index == roundActivityButtons.count {
animateExtendDistance()
return
}
let roundActivityButton = roundActivityButtons[Counter.index]
let delay: NSTimeInterval = Counter.index == 0 ? 1 : 0
UIView.animateWithDuration(animateDropDuration,
delay: delay,
usingSpringWithDamping: animateDropDumping,
initialSpringVelocity: animateDropVelocity,
options: .CurveLinear,
animations: {
let changedFrame = CGRectMake(roundActivityButton.frame.origin.x, (self.bounds.height / 2) / dropButtonsPositionCoefficient – roundActivityButton.frame.height / 2, roundActivityButton.frame.width, roundActivityButton.frame.height)
roundActivityButton.frame = changedFrame
}) { finished in
if finished == true {
Counter.index += 1
self.aimateDrop()
}
}
}
private func animateExtendDistance() {
UIView.animateWithDuration(animateExtendDistanceDuration,
delay: animateExtendDistanceDelay,
options: .CurveLinear,
animations: {
for index in 0..<self.activitiesCount {
if index == self.centerActivityRoundButtonIndex { // the number is odd then the central position of the index does not change
continue
}
let roundActivityButton = self.roundActivityButtons[index]
let originDeltaX: CGFloat = (self.activitiesCount / (index + 1)) < 2 ? –self.gapBetweenActivityButtons / 2 : self.gapBetweenActivityButtons / 2
let changedFrame = CGRectMake(roundActivityButton.frame.origin.x – originDeltaX, roundActivityButton.frame.origin.y, roundActivityButton.frame.width, roundActivityButton.frame.height)
roundActivityButton.frame = changedFrame
}
}) { finished in
if finished == true {
self.animateCollect()
}
}
}
The last class – ActivityContainerView – accepts the structure of the Activity type and is responsible for the animated change of the activity using CABasicAnimation class for an animated turn of activity and the delegate method for an animated zoom after the turn:
// MARK – Public methods
func flipView(activity: Activity) {
self.containerView.transform = CGAffineTransformIdentity
configureViewsBeforeFlip(activity)
let transform = CATransform3DMakeRotation(CGFloat(M_PI), 0, 1, 0) // rotate around Y
let flipAnimation = CABasicAnimation(keyPath: “transform”)
flipAnimation.fromValue = NSValue(CATransform3D: CATransform3DIdentity)
flipAnimation.toValue = NSValue(CATransform3D: transform)
flipAnimation.duration = flipAnimationDuration
flipAnimation.fillMode = kCAFillModeBoth
flipAnimation.removedOnCompletion = true
flipAnimation.delegate = self
subview!.layer.addAnimation(flipAnimation, forKey: “transform”)
}
override func animationDidStop(animation: CAAnimation, finished flag: Bool) {
if flag == true {
configureViewsAfterFlip()
UIView.animateWithDuration(animateStateDuration,
delay: 0,
usingSpringWithDamping: animateSpringDamping,
initialSpringVelocity: animateSpringVelocity,
options: .CurveLinear,
animations: {
self.containerView.transform = CGAffineTransformMakeScale(animateTransformScaleX, 1)
}, completion: nil)
}
}
Ta da! You’re ready to go with the animation! Hope you enjoy it in your app.


 Adventure: NFTs, Gaming, and Community Building")
