The Windows OS based computers are infamous for becoming slower over time. The Windows 10 based PC’s may not become too slow over time, but the computers and PCs with older versions of Windows tend to get reduced performance over time. The annoyance of a PC or a laptop running unbearably slow is immeasurable.
If your Windows PC or computer is also suffering from performance issues, follow the methods shown in this article to boost the available RAM cache memory and clear out old unnecessary memory.
Probable reasons for the computers to slow down
Some reasons for slowing down the computer are hard to address and control, but some issues related to slowing down your PC can be handled.
Solvable issues
1. Corrupted sectors of the hard disk drive or defected memory chips due to usage over time.
2. Software related memory leaks.
3. Not adequate RAM installed.
4. Degraded system components due to wear and tear and power surges.
5. System resources eaten up by viruses and malware.
6. Too many programs launching and using memory at startup.
However, you can’t solve defective hardware related effects on the RAM or cache memory; you can speed up your PC or computer by following some methods like:
1. Performing virus scans and removing unwanted programs that eat up too much memory.
2. Defragmenting your hard disk drive.
3. Disabling the UAC ( User Account Control).
The above methods to speed up the computer and boost its performance are not as significant as the below methods. Fully optimizing the memory usage should be your first goal to run your PC smooth with astonishing performance.
So if you are wondering How to clear ram on windows 10, how do I free up ram on windows 10? follow on.
Automatically Clear RAM Cache Memory in Windows 10
Here are working methods to clean memory cache in Windows 10. It will increase system processing speed and improve performance.
1. Minimize Startup Programs
Some programs or software installed on your PC may not utilize the RAM regularly and are not visible at the top of the Windows Task Manager list. However, some programs run under big software as a sub-process and auto-launch themselves at the startup of your computer and utilize a significant amount of the available RAM of your PC.

1. Click on the Startup tab in your PC’s Windows Task Manager.
2. Sort the list of processes from the Startup impact column.
3. Find the processes or applications that are unknown to you, or you don’t need them, and disable all such applications that run at your computer’s startup.
Even if some small programs were eating up your PC’s memory, disabling many of them from running at the startup can save a significant amount of memory on your computer. These unwanted programs or software could be some of the residue processes of previously uninstalled software or some software which you forgot you installed at some point in time.
2. System processes eating up too much RAM
The easiest and quickest method to clean up the RAM or memory being used is to ensure no system processes or unwanted programs are eating up all the system resources.
1. Open your Windows system’s Task Manager by either pressing Ctrl+Shift+Esc keys simultaneously or by right-clicking on the taskbar at the bottom of the windows screen.
2. Select the tab called Processes from the opened Task Manager window.
3. Sort all the processes running by their usage in Memory percentage and find the programs or processes at the top of the list that you don’t recognize.
4. If you find some suspicious applications or programs using too much of your RAM amount, consider uninstalling them by utilizing the app wizard or using the Windows Control Panel -> Programs and Features.
3. Clear Page File at Shutdown
The windows operating system clears the system RAM at every shutdown of your computer. However, it doesn’t remove the page file stored on your computer’s hard disk drive.
The operating system utilizes the page file(an allocated space on the physical hard disk drive) as an extra RAM when the physical RAM installed on your PC is full. Clearing the page file just like the RAM will make your computer’s storage efficient and clean for the next startup.
To enable the auto cleaning of the page file at shutdown, you need to change the registry key of the ClearPageFileAtShutdown from 0 to 1 by utilizing the Windows Registry Editor.
1. Open the inbuilt Windows Registry Editor of your Windows 10 computer either from the Start menu or by typing in the keyword called Regedit in the Run Dialogue Box and pressing the enter key.
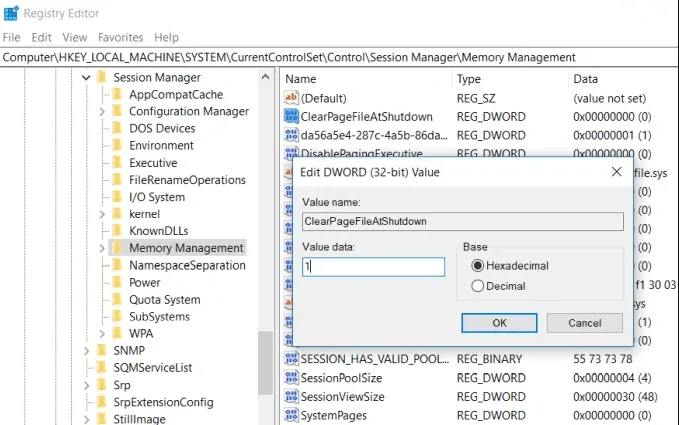
2. Under the Registry Editor window, head over to the path: HKEY_LOCAL_MACHINE\SYSTEM\CurrentControlSet\Control\Session Manager\Memory Management.
3. Find the option called ClearPageFileAtShutdown from the right-pane and double-click on it.
4. Change the Value data from 0 to 1 and click the OK button.
On the next reboot of your PC or computer, the page file will be removed by the system at the shutdown itself.
There are many other defrag softwares that will help you to remove unwanted files from your hard disk.
4. Clear memory cache windows 10 cmd / Flush Memory Cache
Some software or programs, while closing, don’t release all the system memory allocated to them at starting. These memory allocations become orphan threads or lost memory junks over time and affect the system performance by slowing it down.
Follow this shortcut %windir%\system32\rundll32.exe advapi32.dll, ProcessIdleTasks to clear the old lost memory and flush the memory cache. You can also flush the DNS and other cache files using the command prompt in windows 10.
5. Other considerable things to boost the Memory of your PC
1. For better RAM cache memory clearing and management, consider increasing the amount of RAM on your laptop or computer.
2. Adjust your graphics settings for best performance with better cache and memory management by eliminating useless visual effects.

3. Ensure every driver related to storage and memory are up to date and not corrupted because outdated or defective drivers sometimes cause memory leaks and degrade your computer’s performance.
4. Make sure you don’t use damaged or defective hardware components like RAM, Hard Disk, etc., for longer periods of time because it also affects other components making the computer even slower with compromising the performance.
We hope this article about How to Automatically Clear RAM cache Memory in Windows 10 has solved all your queries regarding the topic and given some deep and elaborative insights into the impacts of Memory and cache management on your computer or laptop’s performance.