

Coinbase 101
Coinbase is a cryptocurrency exchange and is the world’s largest exchange. Being the world’s largest doesn’t make it the best, although Coinbase comes with some attractive features, it does need to compete with the stiff competition.
Let’s take a closer look at what Coinbase has to offer.
Basics
Coinbase is available in over 30 countries and is used to trade in bitcoin and other alt-coins and tokens, using a connected bank account, credit/debit cards, SEPA transfer, Interac Online, and other payment methods. The system allows for high buying limits and is very liquid when using credit cards. However, it does not have as many payment methods you would expect from such a prolific site.

Using Coinbase
Step 1: Open an Account
Obviously, go to Coinbase and click on “Sign Up.”

You will now go through the long, frustrating and sometimes downright aggravating process of setting up a crypto wallet, and this is the same process for all secure crypto sites, so don’t think that Coinbase is better or worse than any others, they are actually all the same.
Note: If you come across an easy to register site, run away…it is not secure.
In the create an account screen you get to fill in all the basic information, and you will need to verify the email address you provide before continuing.


After verifying your account you then continue to input your data, this includes your phone number, and this also demands a verification step before continuing.


After you have confirmed the basic info stage, you will start the ID verification process, and I suggest you have all your documents ready by your side.
ID Verification
Coinbase is a US based company, so they go by the Know Your Customer (KYC) and Anti Money Laundering (AML) laws. Crypto trading is considered to be a money laundering haven, so regulators make sure that the users are all known within the system. You will need to provide a passport, a selfie holding it, and in some cases even have a video interview with a security representative.
After you finished the SMS confirmation step you should have been given a link to the ID verification stage, if not, just go to the “Buy and Sell” tab, and select the “Submit ID + Photo Verification” option.
In this stage of the registration process, you will need to fill in the form and upload the relevant documents.


The documents you need to provide can be a drivers license, passport or any photo ID that is acceptable by Federal rules. You can upload this document using file upload, or by taking a photo of it using a webcam or smartphone cam.
You must assure that the ID is readable and that all four corners of the ID card are visible if not, you will be asked to resend the document. Once the document is uploaded, you must wait for it to be verified.
Additional Security
After receiving ID verification, you must (optional) enable 2-Factor Authentication (2FA). This is optional but is a mandatory security feature for any serious and professional crypto trader.
Go to the settings page, and then select the security option.

In the security tab, scroll down and select the “Two-Factor Authentication” option. In this section set the verification code for any amount of digital currency and press the “Enable Authenticator” button.

You will receive a 7-digit code by SMS, enter it into the page and then Coinbase with creating an authenticator code for you which gives you 2-Factor Authentication. To use 2FA, you will need to download Google Authenticator onto your smartphone.
Upon downloading the app, scan the QR on your PC screen, or by entering the code into the app. This will set the app to generate a Coinbase code every few seconds. This constantly changing code adds an extra layer of protection from hacking. The only way to access your data is if someone gets your 2FA code or smartphone.
Now that the security measures are all in place let’s add payment methods.
Payment Methods
Obviously, before you can trade in crypto assets, you will need to add a payment method that provides hard currency for purchasing. There are three options to choose from, and these include:
Debit card, bank account, or wire transfer.
I will show you how to add a debit card and a bank account in this guide.
Start off by going to the Setting menu and choosing the linked accounts option.

In this screen, you pick the “Link a New Account” and begin the process of adding a payment method.

The screen you will receive provides you with three options; I will now discuss the debit card option. Note, there is no credit card option, and this is due to credit card security issues that Coinbase quite correctly wants to avoid. (Nothing beats preventative risk management).
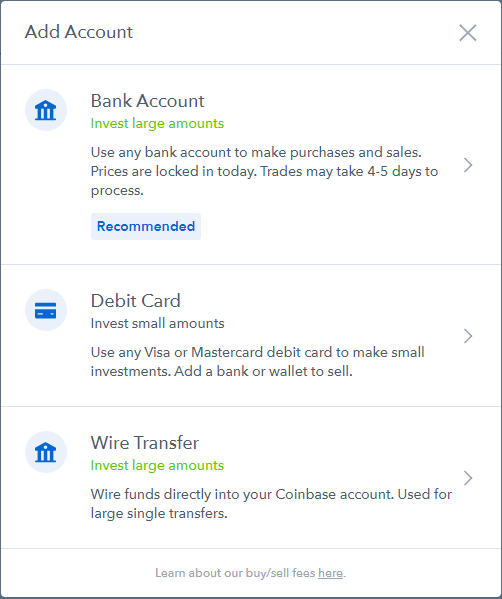
Debit Card
Debit cards are usually the safest method for trading, and an unlinked debit card, a “preloaded” card is the safest method for disconnecting the wallet from your money source. You can always set up a bespoke bank account just for trading, but the hassle is sometimes not worth it.
Debit cards are great for quick trades, which is what most people usually handle. The limit for such an option will start at around $300 a week. There is also another downside to debit cards; they incur an additional 4% service fee. Just consider this before trading, since these percentages do affect the profitability of small traded amounts.
Its simple to link a debit card. Just fill out the information. After you complete this step, wait for Coinbase to verify the card. This will take a day or so since they will charge your card a small fee (under $1.00) which is canceled after confirmation. What you need to do is enter the last 2 digits of the charge, and if you see a $1.00 charge, ignore it.
Your card is now in the system, and you can begin to trade.


Bank Account
You add a bank account for making large trades, and remember, in this case, the transfers take time, and you might have to wait around 4-5 days before seeing the assets in your wallet. Also, consider this, if you are into fast trading, don’t use a bank account, especially when the market is volatile. You cannot trade in the assets until they appear the wallet, so if the market rises radically, you cannot sell, and if the market drops radically, you cannot sell either, but you can buy more if you so desire.
Bank purchase limits are higher you have a minimum ceiling of $7,500 per week, and the service fee is only 1.5%.
Linking a bank account is also a basic process, so let’s take a look at how to link your bank account to Coinbase.


Start off by choosing a bank that has an account. If you have more than one account, I suggest dedicating one just for this. If the site does not have your bank in it, don’t worry, you can add the account manually. Take into account that verifying a bank account will take around 4-5 days since you need to enter that 2-digit code which can take time till it appears in your bank statement.
The screen for connecting an account is basic, and all you need to do is add the information required.

So, now we have completed the payment methods, let’s take a look at actual trading.
Purchasing Cryptocurrency
Start off by choosing the Buy/Sell menu and jump right in.
First choose what asset you want to purchase, then choose your payment method and currency, then press “Buy.” After this, you will be asked to confirm the transaction. Remember, once you press confirm, you cannot cancel. This is a blockchain.


If you have a 2FA security feature, you will need to add the code for confirmation.
Selling the assets is the same process, but by pressing the Sell option instead of the buy.
Depositing/Sending Cryptocurrency
Since cryptocurrencies can be stored in multiple locations and wallets, and since you can buy and trade from many platforms, you will be able to transfer assets rather than trade in them. This is performed through the “Accounts” menu.
If you want to receive currency, Coinbase will generate a wallet address for you to use for all receipts. This is now your own unique wallet for each asset type. This means that you will need a unique address for each coin and token you want to trade with.

Here is an example of a bitcoin wallet address.

Sending assets is easy, all you need is the recipient address, you enter this into the field, add the amount of asset you want to send and press “send”.
Word of caution: NEVER make a mistake in the wallet address. Once you have sent the asset it is gone, there is no “retrieval,” “reversal,” or “Shit I made a mistake, give me my money back” scenarios.
Once you press the continue button, you will be asked to enter the 2FC; this is a perfect time to double check the receiver’s address. Pressing confirm is a one-way action.


So, there you have it. We set up an account, added payment methods and traded and transacted in assets. Now let’s take a quick peek at the fees in comparison to Coinbase competitors.
In this table, you see which methods are supported by Coinbase, in which countries, currencies and the fee.
| Payment Method | Countries | Funds Available | Currency | Fees |
|---|---|---|---|---|
| Bank Transfer | USA | 5-7 days | USD | 1.49% |
| Debit Card | USA | instant | EUR | 3.99% |
| Debit Card | Canada | instant | CAD | 3.99% |
| SEPA Transfer | Europe | 1-3 days | EUR | 1.49% |
| Debit Card | Europe | instant | EUR | 3.99% |
| Debit Card | UK | instant | GBP | 3.99% |
| Xfers Transfer | Singapore | instant | SGD | 1.49% |
| Debit Card | Australia | instant | AUD | 3.99% |
Now let’s compare the debit card fees to the competition.
| Icon | Exchange | Fees | Countries |
 |
Coinbase | 3.75% | USA, Europe, Canada |
 |
Coinmama | ~6% | Global |
 |
Bitpanda | 5% | Europe |
 |
CEX.io | 3.5% | Global |
Account Review
You can view your account history and all transactions in the account tab.
Account Safety
Coinbase is a great exchange, but should not be used as a wallet for storing assets. There are many options for storing large amounts, and every time you want to add funds to your Coinbase account just use the transfer funds feature.
Having stated this, there are three types of Coinbase wallet to use: wallet, vault, and multisig vault.
Coinbase Bitcoin Wallet
This is the wallet for storing your bitcoins, and if you value your bitcoins make sure you transfer them to a secure wallet that only you control. Another very important aspect to remember is that Coinbase can shut down your account and block access to your funds whenever they want to or need to.
Coinbase Vault
This is a multi-authorized “wallet” where you need to tow or more approvers to access the assets stored in the vault. This is a good solution for companies that have heavy trading capacities. Again, when you leave your assets with Coinbase, you do not have total control over them, and Coinbase can close a vault or deny you access any time.

Multisig Vault
The multisig vault is a wallet that has three keys to open it. One is held by Coinbase, one is a shared key, and the third key is held by the account owner. This vault requires any two keys to access the funds; this is very useful since the funds cannot be held by Coinvault since the shared key is encrypted with your password. Personally, I have not found anyone I know that uses this option, but I guess there are some users out there that want the extra security of knowing access is a matrix.
Where is Coinbase Operating?
Austria, Belgium, Bulgaria, Canada, Croatia, Cyprus, Czech Republic, Denmark, Finland, France, Greece, Hungary, Ireland, Italy, Latvia, Liechtenstein, Malta, Monaco, Netherlands, Norway, Poland, Portugal, Romania, San Marino, Singapore, Slovakia, Slovenia, Spain, Sweden, Switzerland, UK, USA.
Conclusions
Coinbase is a very easy to use trading platform; the exchange is comprehensive and yet simple to use. The reason its popular is because it is a secure site, and the GUI is great.


